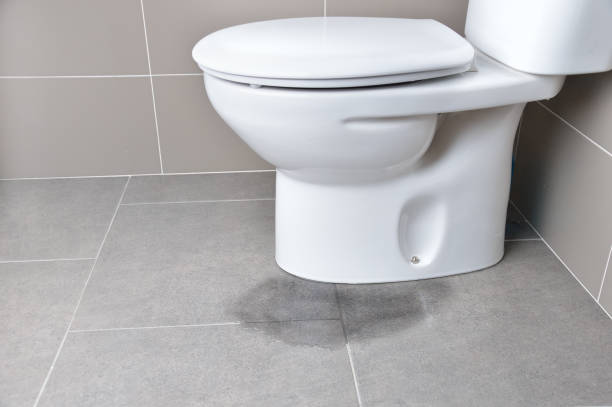
A toilet base leak is more than a small annoyance—it’s a warning sign of a bigger plumbing issue. Water pooling around the toilet can damage floors, cause odors, and lead to costly repairs if ignored.
The good news? Most toilet base leaks can be resolved with proper leaking toilet repair techniques and effective plumbing solutions. Following the right steps ensures a long-lasting water damage fix and prevents future problems. In this guide, you’ll learn how to identify the cause, repair the leak correctly, and keep your bathroom safe and dry
Finding a Leak at the Bottom of the Toilet
People typically ignore a leak at the base of the toilet because the indicators can be hard to see. A lot of people think it’s condensation or water left over from cleaning. The first step to fixing a leak for good is to find it correctly.
Signs that a toilet base is leaking
The most visible indicator is water collecting around the base of the toilet. This water normally shows up after you flush or builds up slowly over time. In more serious situations, the floor near the toilet may feel soft or seem different.
Bad Smells Around the Toilet
Sewer gasses can go out if the seal is broken. If you keep smelling foul scents even after cleaning, the seal or wax ring under the toilet may be broken.
Moving or wobbling toilet
If your toilet rocks when you sit on it, that’s a big red flag. Movement breaches the seal between the drain flange and the toilet. Even a little bit of swaying might make the toilet leak every time you flush it.
How to Find Out Where the Leak Is Coming From
Make sure the floor is fully dry all the way around the base of the toilet. Flush the toilet a few times and keep an eye on it. If water only comes out after you flush, the leak is coming from the base, not the tank or supply line.
Finding the leak early can assist keep the floor from becoming damaged, mold from growing, and expensive structural repairs from happening. You can confidently go ahead with the repair once you know where it came from.
What Makes a Toilet Base Leak
Knowing why a toilet leaks at the bottom makes fixing it easier and more effective. Most of the time, the problem isn’t with the toilet itself, but with a broken seal or bad installation.
Wax Ring That Is Worn Out or Broken
The wax ring makes sure that water can’t get through between the toilet and the drain pipe. Wax might dry out, crack, or move over time. In this case, every time the toilet is flushed, water spills out. This is the main reason why toilet bases leak.
Closet Flange that is Broken or Not in the Right Place
The closet flange links the toilet to the drain and holds it in place on the floor. The wax ring won’t seal correctly if the flange is broken, rusty, or put in too low. This means that even after you change the wax ring, it will still leak.
Toilet bolts that are loose or rusted
Bolts keep the toilet from moving. The toilet can move while you’re using it if the screws come loose or rust. This action cracks the wax seal and lets water out around the base.
The toilet isn’t level.
The toilet may be at an angle because the floor is uneven or the installation was not done correctly. This exerts different amounts of strain on the wax ring, which makes it break too soon. A toilet that isn’t level is more likely to leak and shake.
Cracked Base of Toilet (Uncommon but Serious)
The porcelain base of the toilet may be damaged in very uncommon circumstances. This might happen if the bolts are too tight or if something hits it. If the toilet is cracked, sealing it won’t work, and you’ll need to get a new one.
Knowing exactly what caused the leak can help you address it right away instead of wasting time on interim fixes.
Materials and Tools You will need
Get all the equipment and materials you need before you start the repair. Getting things ready ahead of time saves time and helps you avoid making mistakes during installation.
Important Tools for the Job
To loosen and tighten bolts, you’ll need a socket set or an adjustable wrench. You need a putty knife to cleanly scrape off the old wax ring. To preserve the floor and get rid of standing water, have a sponge, bucket, and towels close by. A level is also vital to make sure the toilet is level when you put it back in.
Necessary Parts for Replacement
To seal the toilet correctly, you need a new wax ring. Depending on the height of your flange, you can choose between a regular wax ring and one that is strengthened. You might need a seal without wax or a wax ring that is unusually thick in specific circumstances. It is best to get new toilet bolts and bolt caps, especially if the old ones are broken or rusty.
Things that are optional but useful
When you work, rubber gloves help keep things clean. If your toilet is sitting unevenly on the floor, plastic shims can help keep it stable. You might need a flange repair ring or spacer if the closet flange is broken. After putting everything together, you can use caulk to seal the base, but leave a tiny space at the back so you can find leaks.
Getting these equipment and materials ready ahead of time makes ensuring that the repair goes smoothly, quickly, and without leaks.
Getting the toilet ready for repairs
Before taking out the toilet, it’s very important to get ready. If you don’t follow these instructions, you could spill water, damage anything, or make a mess.
Stop the water flow
Find the shutoff valve near or behind the toilet. Keep turning it clockwise until it stops. This stops the water from flowing to the toilet and stops it from filling up again while the repair is going on.
Get rid of the Tank and Bowl
To get rid of most of the water in the tank and bowl, flush the toilet. To let out as much water as possible, hold down the flush handle. Get rid of any extra water using a sponge or small cup and put it in a bucket.
Unplug the water supply line.
Put a towel or pail under the supply line connection. Use an adjustable wrench to release the nut that holds the water line to the toilet tank. Put the line aside and let any water that is still there drain out.
Keep the floor area safe
Put old towels or cardboard around the base of the toilet. This keeps water, wax, and scratches from getting on the floor as you take it off.
Look for Problems That Are Easy to See
Before you move on, look for clear evidence of damage, including loose bolts, fractures in the porcelain, or rust around the base. This early check-up helps you plan the repair better.
After these steps are done, you can safely take the toilet out without making a mess or breaking anything.
Taking the Toilet Out Safely
Taking the toilet out the right way keeps the floor, flange, and toilet itself from becoming damaged. Be careful with this step because toilets are hefty and break easily.
Take off the nuts and bolt caps.
First, take off the plastic caps at the bottom of the toilet. Use a wrench that can be adjusted to loosen and take off the nuts from the toilet bolts. If the bolts are rusty, use penetrating oil and wait a few minutes before trying again.
Take Off the Old Seal
To break the seal made by the old wax ring, gently jiggle the toilet back and forth. Don’t push it too hard, as this could break the porcelain or hurt the flange underneath.
How to Lift the Toilet
Hold the toilet firmly on both sides, close to the bowl. To get rid of the bolts, pull straight up. To avoid getting hurt, keep your back straight and bend your knees. Move slowly and carefully since toilets are heavier than they look.
Get the Toilet Out of the Way
Put the toilet on a safe surface, like cardboard or a towel, with the bottom facing up. This keeps the wax from spreading and keeps the floor from getting scratched.
Close the drain opening
Put a rag in the open drain pipe. This keeps sewer gases from getting into the room and stops tools or trash from dropping into the drain.
Now that the toilet is securely out of the way, you can look at the wax ring and flange to find out what caused the leak.
Checking and fixing the wax ring and flange
After taking out the toilet, the next step is to check and fix the wax ring and closet flange. These parts are the most likely to leak at the base.
Take off the old wax ring.
Use a putty knife to scrape out all of the old wax off the bottom of the toilet and the flange. Make sure there is no wax left over, because that can stop a good seal. Be careful while throwing away the old wax because it can attach to things and be hard to clean up if it’s smeared.
Check the closet flange
Look for cracks, rust, or warping on the flange. A new wax ring won’t seal correctly if the flange is broken or too low. Screws should be used to attach the flange to the floor if it is loose.
Fix or replace the flange if necessary.
Use a flange repair ring or spacer to raise the flange to the right height if it is broken or too low. This makes sure that the wax ring lays evenly and makes a tight seal when you put the toilet back in.
Choosing the Right Seal
Most repairs can be done with regular wax rings. If the flange is a little lower than the floor or if you need a stronger seal, you might choose to use an extra-thick wax ring or a rubber seal that doesn’t have wax in it. These make the seal stronger and last longer.
Be careful when putting on the new seal.
Put the new wax ring on the flange or right on the toilet outlet, depending on what the manufacturer says. Make sure it is in the middle so that it doesn’t leak. Don’t squeeze or twist too hard, as this can break the seal before you put it in.
You can stop the most common causes of a leaking toilet base by carefully checking and fixing the wax ring and flange. This will also make it easier to replace the toilet.
Putting in a new seal and moving the toilet
It’s time to gently put the toilet back together after getting the wax ring and flange ready. Putting things in the right spot makes sure they fit tightly and stops leaks in the future.
Put the toilet on top of the flange
Raise the toilet and line up the holes in the bolts with the bolts in the flange. Don’t tilt the toilet when you lower it. Make sure the toilet is level on the floor and the wax ring is in the middle.
Gently push down on the toilet
Carefully step down or push down evenly on both sides of the bowl to compress the wax ring. This makes a seal that keeps water from getting between the toilet and the flange. Don’t rock or twist the toilet, as this could break the seal.
Make sure the toilet bolts are tight.
Put nuts and washers on the flange bolts. Slowly tighten them, switching sides to make sure the pressure is uniform. Don’t tighten too much; too much power can break the base of the toilet.
Check the level of the toilet
Make sure the toilet is level by using a level. Use plastic shims to keep it from rocking. Put the shims under the base, but don’t put too much pressure on them, or the porcelain could break.
Put the water supply back on
Reconnect the line that brings water to the tank and tighten the connection by hand. Before turning on the water all the way, check for any leaks.
For a leak-free and stable installation, it is very important to put the new seal in the right place and move the toilet to the right place. After that, the toilet can be tested and tightened one last time.
Making sure everything is secure, reconnecting it, and checking for leaks
After putting the toilet back in place, the last procedures make sure it is stable, watertight, and ready to use every day. If you skip these processes, you can have leaks or wobbles in the future.
Tighten the bolts on the toilet
Slowly tighten the nuts on the flange bolts, switching sides to make sure the pressure is even. The goal is to make sure the toilet is stable without breaking the porcelain. Stop tightening as soon as the toilet feels stable.
Reconnect the water line
Connect the water supply line to the tank and tighten it by hand. Slowly turn the shutdown valve back on so that the tank may fill up. Look for any leaks at the joint and, if needed, tighten it a little bit.
Flush and look for leaks
Flush the toilet a few times after the tank is full, and watch the base and supply line. Check to see if any water is leaking around the base. If you see water, tighten the bolts a little or check to see if the wax ring is lined up correctly.
If Necessary, Level and Stabilize
Put plastic shims under the base of the toilet to keep it from rocking. Cut off any extra shim material so it doesn’t show, and don’t tighten the nuts too much after that.
Caulk the Base (optional)
For a tidy finish, put a thin line of caulk around the base. Leave a little space at the back so that leaks, if they happen, can be seen instead of being hidden by the caulk. This also keeps the floor from getting wet.
Following these procedures will make sure your toilet is safe to use, doesn’t leak, and is secure. Testing the repair properly makes sure it will last and keeps your floors safe from water damage.
How to Stop Future Toilet Base Leaks
The only way to fix a leaky toilet foundation is to do more than that. Taking steps to stop leaks from happening again safeguards your plumbing and floors.
Make sure the installation is correct
A toilet that is fitted correctly is less likely to leak. Always use the right seal or wax ring for the height of your flange. Also, make sure the toilet is level on the floor and that the bolts are uniformly tightened. Don’t tighten too much, because that can break the porcelain.
Watch the toilet move
Check the toilet from time to time to make sure it is still stable. Over time, even a little rocking can destroy the wax seal. If you see the base swaying, use shims to keep it steady or carefully re-tighten the bolts.
Check for wear on a regular basis
As time goes on, wax rings can break down and flanges might become loose. Check the base of your toilet once a year for signs of leaks, rust, or movement. Finding problems early stops them from getting worse and costing a lot of money to fix.
Don’t let the water pressure get too high.
A lot of water pressure or flushing a lot of water often might put stress on the wax seal. Make sure the water pressure in your home is safe and don’t flush heavy things down the toilet unless you have to.
When you need help, call a pro.
If you see leaks that won’t stop even after the installation is done well, or if the flange is badly broken, call a licensed plumber. Getting help from a professional makes sure the repair lasts and keeps your floor from being damaged.
You can make your toilet last longer, lower the chance of leaks, and keep your bathroom safe and clean by doing these actions.
In conclusion
A leaky toilet foundation is a typical problem that can be fixed. You can stop leaks and safeguard your flooring by finding out what caused them, checking the wax ring and flange, and taking the right methods to fix them. Your toilet will stay steady and leak-free if you take care of it and install it correctly.
For trusted advice and experienced plumbing recommendations, turn to Home Fix Services to help you fix things fast and correctly.


Leave a Reply